Archive for the ‘ventilation’ Category
By: Pakarada Premtitikul
General Manager
InterDry (Thailand) Co., Ltd.
A study on a few typical shipments and the effect on Temperature and Relative Humidity.
Let’s have a look at three commonly used shipping routes and what this does to the temperature and humidity inside the shipping container.
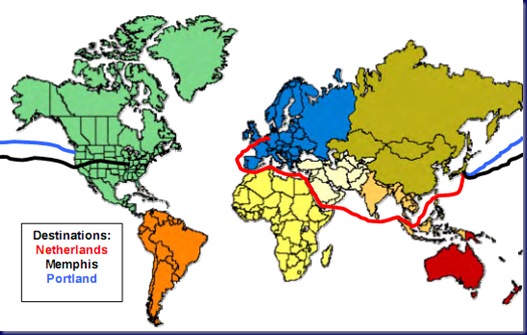
We’ve chosen three routes, namely Japan – Netherlands, Japan – Memphis and Japan – Portland.
Typical Conditions
A normal shipment consists of three distinct stages. The first stage includes the time from container filling until the container is loaded onto a ship. This includes road transportation and brief periods of storage. Daily cycles of temperature and humidity are common. For example, figure 2 includes temperature swings of 40° F [22°C] during the first stage of a shipment from Japan to The Netherlands.
The second stage is the actual time at sea or aboard a ship. This may or may not be the longest stage during the container’s journey. During this stage, daily cycles of temperature and humidity are usually very minor or completely non-existent. Temperature changes are gradual, often occurring over days rather than hours. Occasionally, a single temperature/ humidity cycle occurs as the ship makes stops along the route, however extreme conditions are rare. Figure 3 includes a slow temperature rise and fall as a winter route takes the ship near the equator and then north to The Netherlands.
The final stage begins when the container is removed from the ship and continues until the recorder is removed during the freight unloading process. This may include varying periods of time spent in customs, on trains, on trucks, and in storage. Daily temperature and humidity cycles are common and may be extreme.
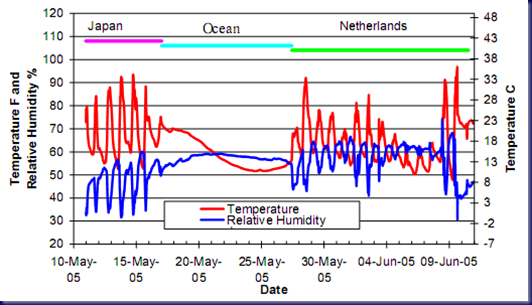
Typical summer shipment – Japan to the Netherlands
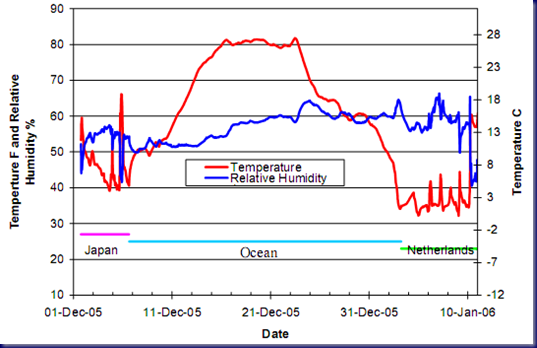
Typical winter shipment – Japan to the Netherlands
Extreme Conditions:
Some of the most interesting recordings are the extreme conditions. The highest recorded temperature occurred on July 25, 2005 during a shipment from Japan to Memphis. The temperature reached 135° F [57° C] during the third stage of this shipment (figure 7).
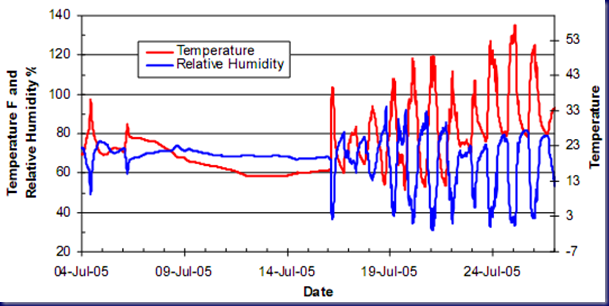
Hottest shipment 135°F (57°C) – Japan to Memphis (USA).
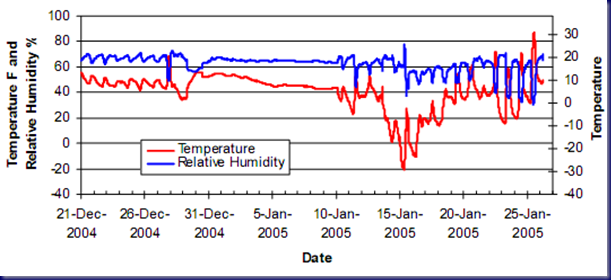
Coldest shipment -21°F (-29° C) – Japan to Memphis (USA).
The lowest recorded temperature occurred on January 15, 2005 also along the Japan to Memphis route (figure 8). The temperature dropped to -21° F [-29° C], which is slightly beyond the recorder’s published temperature range.
The shipment with the highest relative humidity occurred during a trip from Japan to Portland. The relative humidity was recorded at 96% on August 5, 2005 while the container was on land. Figure 6 shows the detailed temperature and humidity profile. The most extreme humidity conditions are seen during periods of large daily temperature changes. In this example, as the temperature slowly drops from 88° F [31° C] to 67° F [19° C] over 9 days, the humidity increases to 88% before returning to 79%. However, starting on August 4 as the temperature dropped from 121° F [49° C] to 68° F [20° C] over a 16 hour period, the relative humidity rose from 32% to 96%. The corrugated boxes seem to absorb moisture fast enough to temper humidity during slow changes in temperature while at sea. However, rapid temperature changes seen on land seem to exceed the rate at which the corrugated boxes can absorb moisture.
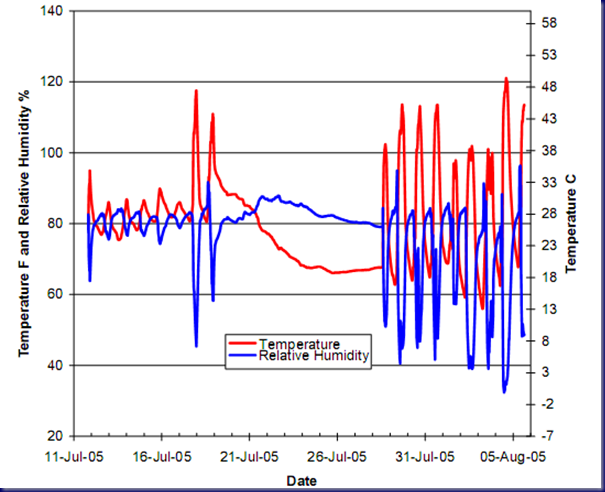
Highest relative humidity 96% – Japan to Portland (USA).
Be sure to check out the following page for more information on how desiccants can save your valuable cargo:
InterDry Thailand
By: Pakarada Premtitikul
General Manager
InterDry (Thailand) Co., Ltd.
Does the colour of a shipping container affect the relative humidity inside?
Steel is currently the most used in the construction of containers despite its poor insulation properties. This is because it is cheap in production and maintenance. Another factor is that it is very suitable to absorb the mechanical forces acting on a container. The colour of the paint on the exterior of the container has an impact on the internal container temperature during sunlight. For a better picture of the impact on the container I will show you two colour charts reflecting the temperature changes in a white and a brown container during the course of one day.
The chart below shows the temperature in different places within a white container and outside each hour of the day. The temperature varies between 40 ° C near the roof and 28 ° C near the floor with an outside temperature of about 28 ° C at noon. During the night, the temperature of the air in the container is about 12 ° C at an outside temperature of 15 ° C.
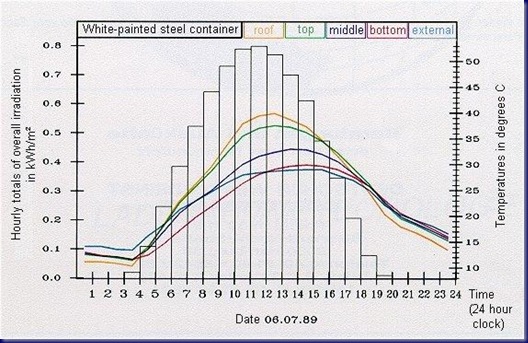
Figure 1: The temperature at different places in a white container at every hour of the day.
A similar study was done with a container with a brown color. There were much higher temperature differences measured. A measurement at midday found a temperature of about 50 ° C near the roof and 35 ° C near the container floor with an outside temperature of 25 ° C.
During the night the air inside and outside the container had similar temperatures, fluctuating around 15 ° C. These measurements are in the chart below
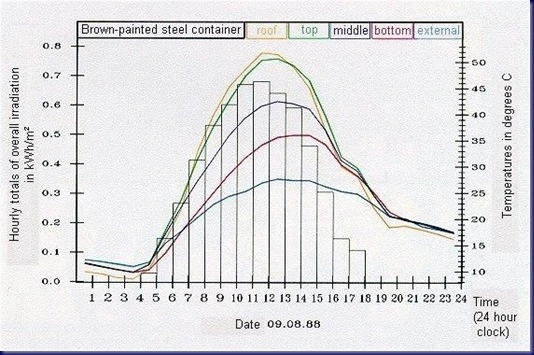
Figure 2: The temperature at different places in a brown container at every hour of the day.
The colour of a container indeed affects the internal temperature. Previous charts showed that a dark container has a temperature increase of about 10 ° C more with the same outdoor temperature (27 to 28 ° C). The relative humidity can change from 80% for example to about 50% which can cause a great hygroscopic imbalance. It also comes with a larger cooling. All the humidity extracted from the goods into the container internal air to balance the hygroscopic imbalance due to the temperature rise in the afternoon will condensate during the drastic drop in temperature in the evening.
The figure below shows an estimate of the occurrence of certain container colour. This estimate resulted from the assumption that the size of the container capacity of 10 major container liners is approximately equivalent to the size of the total number of containers that are transported. And that the container liners only transport using their own containers. Even though bright colours like white, gray and yellow are popular, darker colours like dark blue and even green are also relatively common.
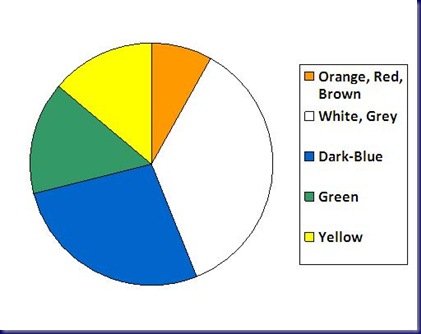
Figure 3: Percentage of container colour occurrence.
We are very excited to announce our new product: “Ecopack Clay Desiccant”. Ecopack consists of highly absorbent natural clay mixed with CaCl2 (Calcium Chloride).

Ecopack is typically used for the protection of goods in containers over long distances and through various climate zones. Ecopack is ideal for goods shipped in jute bags, cardboard cartons, wooden cases or crates or unpacked goods.
Ecopack can absorb over 70% of its own weight and provide moisture protection for over 45 days.
It is very safe in use especially at saturation as the beads remain hard and maintain moisture. Ecopack does not leak.
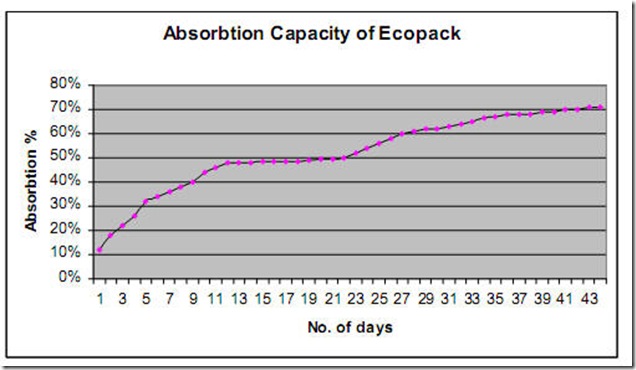
Ecopack vs. competition:
Ecopack activated clay desiccant is the perfect material to replace silica gel.
Its price is competitive, it absorbs more than silica and it fulfils REACH regulation requirements (DMF and Cobalt Chloride free).
Unlike silica gel, Ecopack is environment friendly, non toxic and can be disposed of as normal waste.
For those clients requesting a high quality desiccant with superior absorption rate, slightly more expensive CaCl based desiccants are still the best choice.
Come and check it out at: http://www.interdrythailand.com/products/clay_desiccant.htm

Advice on solving humidity problems
Excess humidity at home can cause the appearance of mould, mildew, fungus and all kinds of nastiness that endangers your and your family’s health.
In order to solve the humidity problems in a room, bathroom, store room, etc. first of all you need to find out the cause of the excess humidity:
If the humidity comes from outside, caused by a leak or by defective insulation, our products will help to reduce the level of ambient humidity, but will not solve the problem for good. The best thing to do is to consult an insulation specialist so as to solve the root of the problem.
If the problem is due to excess ambient humidity in the room because of poor ventilation or condensation, our product can solve your problems.
How does it work?
Put the product anywhere in the room and leave it to work. The desiccant will activate automatically, absorbing the excess humidity. Once the desiccant has stopped absorbing, put in a refill. How long the product lasts depends on the temperature and level of humidity in the room.
It works without electricity or batteries.
Nordic Power Desiccant regulates the level of ambient humidity to bring it down to the recommended optimum level of 45-50%, without drying out the atmosphere, absorbing only the excess humidity.
Is it toxic? Can I use it in a child’s bedroom?
All Nordic products are non-toxic. They can be used without any problem in any room in the house, whether inside a wardrobe, in bathrooms or in store rooms – even in bedrooms. They are also very popular for use on a boat or yacht.
The desiccant contained in the product is calcium chloride, hygroscopic salts which are non-toxic and environmentally friendly.
Finding and Identifying Basement Mold
From: http://www.doityourself.com/stry/finding-and-identifying-basement-mold
Basement mould is a term refers to the types of fungus that grow in basements under certain conditions. Basement mould is harmless in small quantities, but as it grow, it becomes more and more of a health hazard. Some will cause certain types of allergic reactions while others are outright poisonous. If left untreated, the basement mould will keep growing, eventually spreading through the entire building. This is why you must find the mold before the problem gets out of hand. Once you find it, you will need to be able to identify it—otherwise, you won’t be able to figure out how to get rid of it.
Finding Basement Mould
One of the easiest ways to identify the mould is by it’s stench. However, this is only true for some types of basement mould, others may not start to smell until their growth reaches a certain stage. That is why you may want to take a more proactive approach and check the spots where the mould is most likely to emerge. That way, you will have a better chance of spotting it while it is still at manageable size.
Basement mould needs a wet environment in order to grow. It will grow near the pipes and along the walls. The mould feeds on common household materials such as plywood, drywall, furring strips and carpet padding, as well as dust and cellulose in carpets themselves. Try to check any parts of the basement that are hospitable to mould at least once every week. Be sure to bring a flashlight with you—you may not be able to get adequate illumination without it.
If your basement suffers any sort of flooding, the walls will become infested with mould spores, which will remain dormant until they come in contact with water. The spores can remain dormant for a long time. Just because the mould didn’t develop after the flood doesn’t mean it won’t become an issue several years down the line.
Mould Safety
If you find a patch of mould, try not to inhale too deeply and don’t touch the mould with any part of your body. If it gets on your clothing or your tools, wash it immediately. You can identify the mould by sight, so there is no reason why you should be touching the mould in the first place.
Identifying Basement Moulds
Basement mould can be identified based on a number of factors. First, there is colour. Basement mould comes in a variety of colours that range from light gray to black. They may have green, blue and/or brown tinges. If the mould is closer to black, it is either the Stachybotrys or Cladosporium molds. If it’s closer to light grey, it is either Aspergillus or Fusarium moulds.
To figure out which type of dark mould and you have, look at the texture. If the basement mould looks slimy, it is probably Strachybotrys. Otherwise, it’s Cladosporium.
To figure out what kind of light coloured mould you have, look at the growth pattern. If the mold grows in disjoint circular patches, it is most likely to be Aspergillus. Otherwise, it’s Fusarium.
The Next Step
If possible, try to get the mould tested in a lab. While the factors described above are usually fairly good indicators, only the professional analysis will be able to tell for sure. If the mold patches are small, you may be able to remove it yourself. However, if the patches are fairly large, you will need professional help.
From: http://www.doityourself.com/stry/finding-and-identifying-basement-mold


